All you need to know about alpha maskings
Clippings and alpha maskings are one of the most commonly used techniques in image editing. They separate picture elements from their background and are often the basis for the presentation of products in e-commerce, in catalogues or for use in composing and layout design. Alpha masking, also known as soft masking, is ideal for precisely separating fine picture elements such as hair, fur, or even partially transparent elements such as smoke.
The creation of alpha masks
There are several ways to create alpha maskings. The prerequisite is an image editing program that enables the editing of the individual colour channels of an image, an experienced eye and skill.
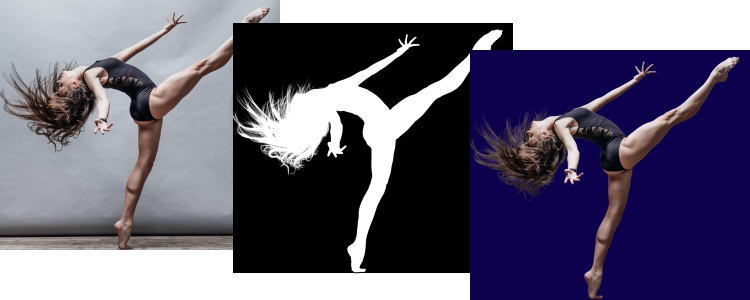
An overview of the basic work steps:
1. Selection of the most contrasting colour channel: by comparing the colour channels red, green and blue (RGB image).
2. Copy channel: so as not to change the original image when editing.
3. Enhance contrast: e.g. via brightness and contrast, curves or levels to capture all important details of the object.
4. Paint over inner and outer areas: Paint outside black and inside white (or other high-contrast colour combination). As close as possible to the edge of the object, without translucent areas.
5. Manual work for details: Manual tracing to capture fine details on the edge of the object, e.g. individual hair.
6. Black and white image: As a result, the white object stands on a black background.
7. Load selection: Load the layer with the edited channel as a selection, which outlines the object perfectly.
8. Create layer mask: Add the active selection to the background layer as a layer mask, invert the mask and delete the content. The masked object stands on a transparent background.
9. Corrections: Further corrections and adjustments if necessary.
10. Convert to alpha channel: Save the edited selection and convert it into an alpha channel. The object (white) is perfectly separated from the background (black). By activating the colour channels the original object becomes visible.
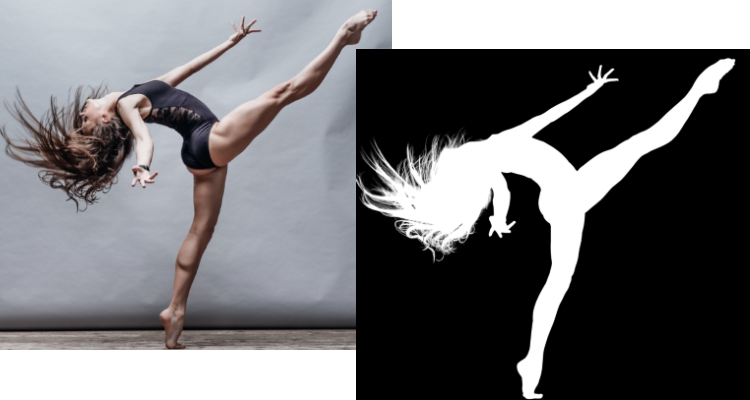
The effort to create an alpha mask depends on various factors: complexity of the object, background, blurring, contrast between object and background etc. The editing process can be relatively quickly or even take several hours.
Different levels of alpha maskings
We divide alpha maskings into different levels with different workloads. This division is done individually. The decisive factor is the original material and the desired result, especially with regard to the complexity of the picture elements, the desired level of detail and the subsequent use.
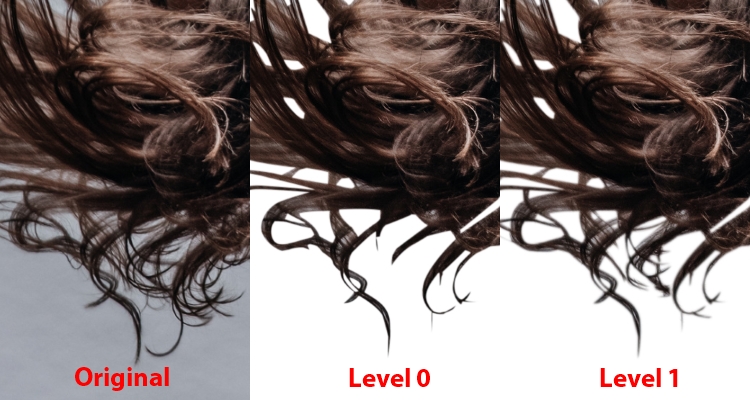
Level 0
A manual path is created around the image elements. The path selection is then saved as an alpha channel or alpha mask with hard outlines. Since no additional processing takes place, any fine details on the outer edges are lost.
Level 1
The processing is basically the same as for level 0. With additional alpha channels, fine details are quickly cut out with softer and more detailed outlines.
Level 0 and level 1 are mainly suitable for simple objects with clear outlines that have none or only a few fine details. The clipping is done as a path with the path selection tool or the quick selection tool and the path is saved as an alpha channel or alpha mask. Any details on the edges of the objects are lost.
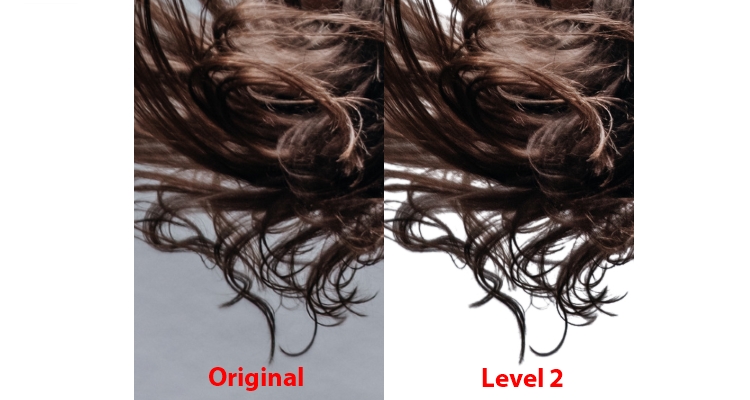
Level 2
Several alpha channels are created and individually optimised. For a more detailed and better result, adjustments are, for example, made using the “Dodge and Burn” tool. This manual process takes more time than Level 1.
Level 2 is suitable for simple objects with fine details that are represented on high-contrast backgrounds, with only simple blurring and which do not require subsequent manual tracing.
Level 3 & Level 4
Complex objects with many fine details such as flying hair on busy backgrounds, strong blurring, complex patterns etc. require much more manual post-processing. Level 3 and level 4 differ primarily in this manual effort, which in turn depends on the original material, among other things. The processing takes place in several alpha channels, which are individually optimised and in which all fine elements are traced by hand.
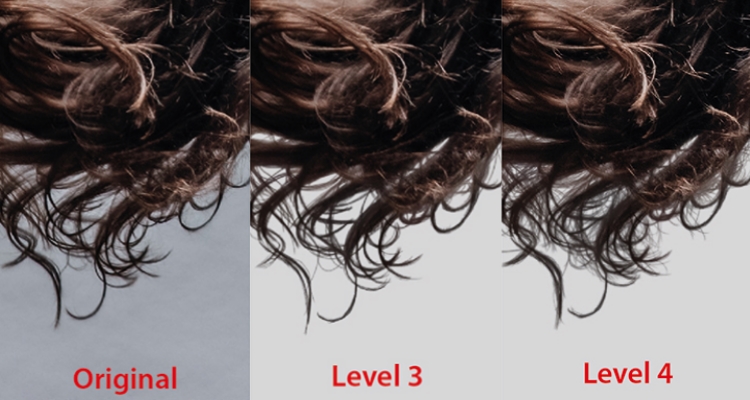
Different types of alpha maskings
In addition to levels, we differentiate between two types of alpha masking.
– Type A: Background change
– Type B: Recolour and colour correction
Level and type are always connected, for example “Alpha masking level 3, type B”.
Why do we make these distinctions?
In order to make the effort and the price structure as transparent as possible for you as well as to clarify the expected result from the beginning and thus to recommend the best possible service for you.
Which image for which level?
Are there any requirements? What is the minimum size of an image for the different levels? We often hear such questions. However, there is no general answer.
One indicator: Clear visibility of relevant, fine details in the original image at 100% zoom, so as not to lose them when alpha masking. With alpha maskings, however, several factors are always important.
The subsequent use of the images is also crucial for the requirements of the original material. Print requires a different quality than online. The same applies to a flyer and a billboard. Is what is planned possible with the existing material? Or the other way around: Is a complex alpha masking according to level 4 necessary at all or is level 2 sufficient and can effort and costs be saved here?
This is where our experts come into play.
Before we start, you will receive professional and individual advice from us.
For offers and results, perfectly tailored to your needs.
Our services include: clipping, alpha masking, masking, composing, ghost model, image retouching, colour correction, layout design, CGI for e-commerce, and more.
- 2023
- January (1)
- 2022
- December (2)
- November (1)
- October (2)
- September (2)
- August (1)
- July (1)
- June (1)
- May (1)
- April (1)
- March (1)
- February (1)
- January (3)
- 2021
- December (2)
- November (1)
- October (3)
- September (2)
- August (1)
- July (3)
- June (1)
- May (2)
- April (1)
- March (1)
- February (2)
- January (4)
- 2020
- December (2)
- November (3)
- October (4)
- September (1)
- August (2)
- July (1)
- June (2)
- May (3)
- April (3)
- March (3)
- February (4)
- January (4)
- 2019
- December (1)
- November (2)
- October (5)
- September (1)
- August (3)
- July (2)
- June (2)
- May (3)
- April (2)
- March (3)
- February (2)
- January (4)
- 2018
- December (2)
- November (2)
- October (3)
- September (3)
- August (2)
- July (2)
- June (2)
- May (1)
- April (1)
- March (2)
- February (3)
- January (2)
- 2017
- December (2)
- November (2)
- October (1)
- September (1)
- August (1)
- July (1)
- June (1)
- May (1)
- April (1)
- March (1)
- February (1)
